
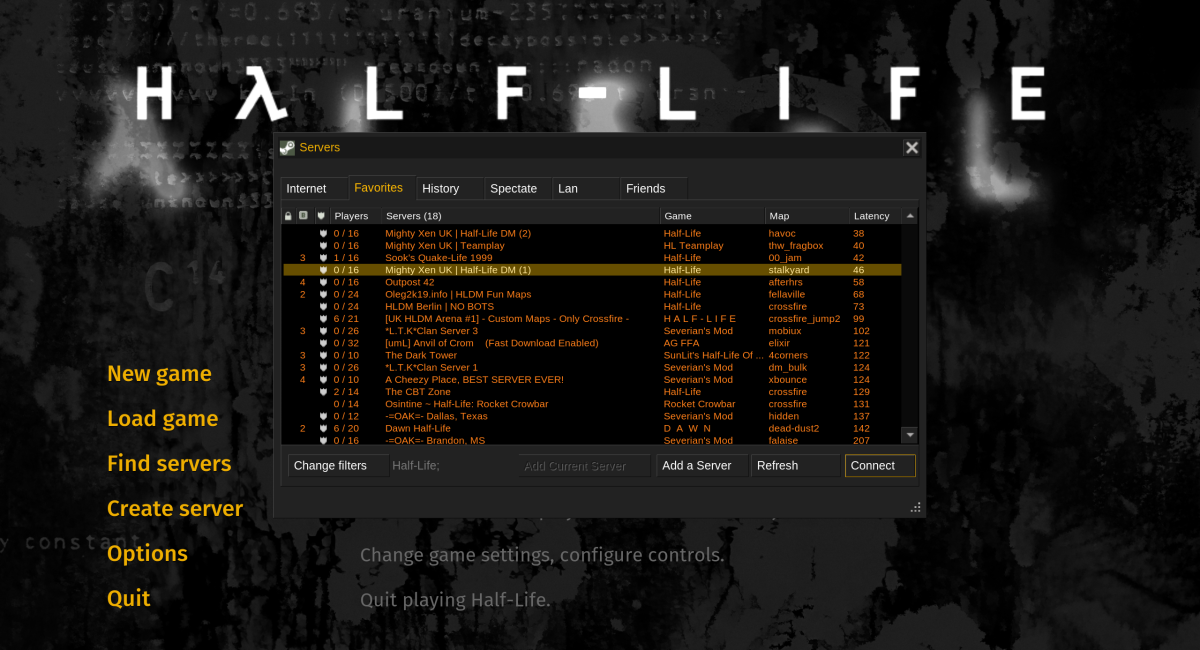
TrackerScheme.res is one of those Half-Life files that most players will probably never notice, but it controls a surprising amount of the appearance of the game’s VGUI interface.
By editing a simple text file you can change colours, fonts, selected items, mouse rollover effects, buttons, scrollbars, borders and other parts of the interface. The changes are particularly noticeable in the Half-Life server browser.
It will not completely redesign the interface or move controls around, but you can dramatically change the way it looks. I used it to give the modern Half-Life server browser a darker orange and black appearance inspired by the original 1998 WON interface.
Before You Start
Before changing anything, make a backup of the original TrackerScheme.res. A missing quote or bracket can cause parts of the interface to display incorrectly, so having the original file available makes experimenting considerably easier.
I normally keep a copy alongside the edited file with a name such as:
TrackerScheme_backup.resYou can edit the file with Notepad, Notepad++, VS Code or any other normal text editor.
Finding TrackerScheme.res
On a normal Steam installation of Half-Life, the main file can usually be found inside:
Half-Life\platform\resource\TrackerScheme.resDepending on the version of Half-Life or the mod you are using, you may also find additional scheme files inside the game’s own resource folder.
If you make a change and absolutely nothing happens, check that you are editing the copy which is actually being loaded by the game.
Understanding the File
The file is divided into a few main sections:
Colors
BaseSettings
Fonts
Borders
CustomFontFiles
You do not need to understand every setting before experimenting. In fact, the Colors and BaseSettings sections alone are enough to completely change the character of the server browser.
Changing the Colours
The Colors section contains named colours which are then reused throughout the rest of the scheme.
A typical entry looks like this:
"BaseText" "238 174 0 255"The four numbers are red, green, blue and alpha:
Red Green Blue AlphaThe colour values normally range from 0 to 255. The final number controls transparency, with 255 being fully visible and 0 being completely transparent.
For example:
"BaseText"       "238 174 0 255"
"ControlText"    "218 218 218 255"
"ControlBG"      "34 34 34 255"
"WindowBG"       "0 0 0 255"
"ListBG"         "0 0 0 255"
This gives you orange main text, light grey control text and dark backgrounds.
What the Main Colours Control
The names are reasonably descriptive once you start experimenting with them.
BaseTextcontrols much of the normal text used in lists and windowsBrightBaseTextis used for brighter or highlighted textSelectedTextcontrols text on selected itemsDimBaseTextis used for less important or inactive textControlTextis used by buttons and other controlsBrightControlTextis commonly used for active or highlighted controlsControlBGis the main background colour used by controlsWindowBGcontrols the background of text and edit areasListBGcontrols list backgrounds, including parts of the server browserSelectionBGcontrols the background of selected itemsBorderBrightandBorderDarkcreate the light and dark sides of the old VGUI borders
The easiest way to learn what they do is to change one colour at a time and reload the scheme.
BaseSettings and VGUI Controls
The BaseSettings section tells VGUI which of the colours defined above should be used for individual controls.
For example:
"FgColor" "ControlText"
"BgColor" "ControlBG"
"WindowFgColor" "BaseText"
"WindowBgColor" "WindowBG"
"SelectionFgColor" "SelectedText"
"SelectionBgColor" "SelectionBG"
Rather than putting RGB values everywhere, the scheme refers back to the named colours. This means you can change SelectionBG once and anything using that colour will change with it.
Mouse Rollover and Button Colours
VGUI often refers to a control under the mouse as being Armed. A control being clicked is normally referred to as Depressed.
For example:
"ButtonArmedFgColor" "BrightControlText"
"ButtonDepressedFgColor" "BaseText"
"ButtonDepressedBgColor" "SelectionBG2"
You can also specify a background colour when the mouse moves over a button:
"ButtonArmedBgColor" "SelectionBG"If you do not want a strong rollover background, you can leave that setting commented out:
// "ButtonArmedBgColor" "SelectionBG"This is particularly useful if you want the text to brighten when the mouse moves over a button without having the whole button suddenly change colour.
Menus and Drop Down Controls
Individual control types can also have their own settings. The menu section, for example, contains separate colours for normal and selected items:
Menu
{
    "FgColor"       "DimBaseText"
    "BgColor"       "ControlBG"
    "ArmedFgColor"  "BrightBaseText"
    "ArmedBgColor"  "SelectionBG"
    "DividerColor"  "BorderDark"
}
The MenuButton section controls things such as the small arrow used on drop down boxes.
This means you can make menus behave differently from normal buttons without changing the rest of the interface.
Changing the Fonts
The Fonts section controls many of the fonts used by VGUI and other parts of Half-Life.
A normal font definition looks like this:
"Default"
{
    "1"
    {
        "name"   "Tahoma"
        "tall"   "14"
        "weight" "0"
    }
}
name selects the font, tall controls its size and weight controls how heavy or bold it appears.
For example, reducing:
"tall" "16"to:
"tall" "14"will make that particular font smaller and can give the server browser a more compact appearance.
Some fonts are used in more than one place, so it is worth making small changes and checking the result rather than changing every font at once.
Resolution Specific Fonts
You may notice some font definitions contain several numbered sections and a yres value.
"1"
{
    "name"   "Verdana"
    "tall"   "13"
    "weight" "600"
    "yres"   "480 599"
}

"2"
{
    "name"   "Verdana"
    "tall"   "15"
    "weight" "600"
    "yres"   "600 767"
}
These allow Half-Life to use different font sizes depending on the vertical resolution of the game.
If you are changing something such as EngineFont, make sure you check the section corresponding to the resolution you actually use.
Changing the Borders
The Borders section defines the old raised and inset edges used around buttons, lists and windows.
For example, RaisedBorder uses BorderBright on one side and BorderDark on the other to create the familiar raised button effect.
Most of the time you do not actually need to rewrite the border definitions themselves. Simply changing these colours:
"BorderBright" "78 78 78 255"
"BorderDark"   "8 8 8 255"
can completely change the appearance of the borders while keeping the original VGUI structure intact.
Example: A WON Inspired Orange and Black Scheme
As an example, the following values give the server browser a dark appearance with orange text inspired by the original Half-Life WON interface.
"BaseText"           "238 174 0 255"
"BrightBaseText"     "255 255 255 255"
"SelectedText"       "255 230 150 255"
"DimBaseText"        "180 130 0 255"
"LabelDimText"       "118 118 118 255"
"ControlText"        "218 218 218 255"
"BrightControlText"  "255 186 0 255"

"ControlBG"          "34 34 34 255"
"ControlDarkBG"      "10 10 10 255"
"WindowBG"           "0 0 0 255"
"SelectionBG"        "102 78 0 255"
"SelectionBG2"       "48 37 0 255"
"ListBG"             "0 0 0 255"

"TitleText"          "238 174 0 255"
"TitleDimText"       "105 105 105 255"
"TitleBG"            "24 24 24 255"
"TitleDimBG"         "20 20 20 255"

"BorderBright"       "78 78 78 255"
"BorderDark"         "8 8 8 255"
"BorderSelection"    "238 174 0 255"
This is not an exact recreation of the original WON interface, but it shows how much of the modern server browser can be changed simply by editing the colour scheme.
Download Our Custom TrackerScheme
If you would rather try the finished version, you can download the custom TrackerScheme.res I use on MightyXen. It gives the Half-Life server browser the darker orange and black appearance shown above, inspired by the original WON interface.
- – WON inspired orange and black VGUI scheme
Before replacing your existing file, make a backup of the original TrackerScheme.res. Copy the downloaded file into your Half-Life platform/resource folder and make sure the finished filename is TrackerScheme.res.
Reloading TrackerScheme.res
One of the nicest things about experimenting with TrackerScheme.res is that you do not necessarily need to restart Half-Life after every change.
The file itself includes a reload shortcut:
Ctrl + Alt + Shift + RSave the file, return to Half-Life and use the shortcut. If the interface you are looking at supports the reload, your changes should appear immediately.
I still recommend restarting the game occasionally while testing, particularly if something appears to be stuck using an old value.
Using Comments While Experimenting
A double slash can be used to comment out a line:
// "ButtonArmedBgColor" "SelectionBG"This is extremely useful when experimenting because you can disable a setting without deleting it.
You can also leave yourself notes:
// Original value was 76 88 68 255
"ControlBG" "34 34 34 255"
I would recommend doing this if you are making a lot of changes. After a while it becomes very easy to forget what the original value was.
What TrackerScheme.res Cannot Change
TrackerScheme.res controls the visual scheme rather than the complete construction of the interface.
You can change colours, fonts, button states, borders and many other visual details, but things such as window positions, column layouts and the fundamental design of the server browser may be controlled elsewhere or by the game itself.
Other parts of Half-Life also use files such as ClientScheme.res and additional resource files, so changing TrackerScheme.res will not necessarily affect every menu or HUD element in the game.
In other words, you can make the modern server browser look surprisingly different, but recreating the original 1998 WON browser exactly would require more than changing the scheme file alone.
Troubleshooting
If Half-Life ignores your changes, make sure you are editing the correct TrackerScheme.res and that the file has actually been saved.
If only some parts of the interface change, the remaining elements may be using another named colour, another scheme file or values defined elsewhere.
If a colour does not behave as expected, search the rest of the file for the colour name. For example, searching for SelectionBG will show every control which refers to that colour.
If the interface looks completely wrong after editing the file, check your quotation marks and braces. The structure of the file needs to remain intact.
If you become completely lost, restore your backup and start again. I find it much easier to make one group of changes at a time rather than trying to redesign the entire scheme in one go.
Where To Go Next
Once you understand how the colour names, control states and fonts fit together, TrackerScheme.res becomes surprisingly easy to experiment with.
Try changing the main colour palette first, then move on to fonts, rollover behaviour and borders. Even fairly small changes can make the server browser feel completely different.
If you want to go further, it is also worth looking at ClientScheme.res and the other files inside Half-Life’s resource folders, as these control additional parts of the VGUI interface.
Summary
TrackerScheme.rescontrols many of Half-Life’s VGUI colours, fonts and borders- The server browser is one of the easiest places to see the changes
- Colours are stored as red, green, blue and alpha values
BaseSettingsdetermines which colours individual VGUI controls useArmednormally refers to the mouse rollover stateDepressednormally refers to a control being pressed- The
Fontssection controls font name, size and weight BorderBrightandBorderDarkhave a large effect on the old VGUI appearance- Use
Ctrl + Alt + Shift + Rto reload the scheme while experimenting - Always keep a backup of the original file